CUSTOMER SUPPORT
Help with common questions
How to submit incidents and problems
Clients of Unlocked Data can submit tickets by emailing [email protected]
When submitting a ticket, please be descriptive and include screen shots where possible. A member of the support team will then prioritise the ticket, investigate, and respond accordingly.
Implementation
Static Internal IP Addresses
Use the Helm Chart to assign static IP addresses to internal resources
MoreKeel Approval Deadline
Instructions on decreasing / increasing the Keel updates approval window
MoreSuperAdmin
This role is assigned to individuals who will be responsible:
- Creating new clients
- Disabling clients
- Creating client Admins (see below)
- Disabling Admins
Admin
This role is assigned by a SuperAdmin. This client administration role can:
- Create new users
- Assign users to clients for which the Admin is responsible
- Disabling users
User
TThis role is assigned can be assigned by SuperAdmin or Admin.
- The User role is assigned to those users will be have access to the Unlocked Data dashboards.
There may be instances where client data is placed in a file share and is removed by the internal API for that client, but it’s never loaded.
In Kibana, you may see the following:
- “Found Zip files”
- “Checking zip file contents”
- “Checking folder for files” <-- under normal circumstances you would expect to see “Import Complete”
Or
- “Found Zip files”
- “Checking zip file contents”
- “Configuring: “ClientDataAPI in Production for client
” <-- under normal circumstances you would expect to see “Import Complete”
In these scenarios it’s likely that the resources have utilised the maximum available memory and you may need to consider a cluster upgrade. Within your AKS cluster configuration, select Monitoring / Insights from the menu to review performance. Getting started with the Unlocked Data solution requires the “B2ms” node pools, but we’ve seen upgrades to “Standard_E2ds_v4” remediate memory capacity issues.

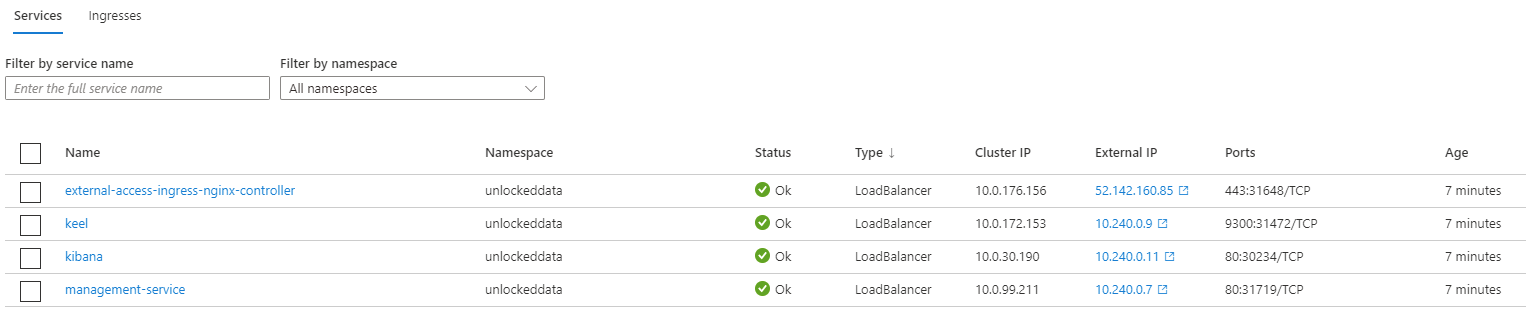
There are instances where clients would like – or need - to assign static IP addresses to the Unlocked Data solution’s internal resources.
The internal resources are only accessible within your organisation and assigning static IP addresses could simplify networking.
Open the client-bespoke-values.yaml file and assign IP addresses associated with your cluster. The example below illustrates an example configuration.

Save the file and upgrade the solution using the following command (including the full-stop).
helm upgrade -f client-bespoke-values.yaml unlock8s .
The command above assumes you are running the command within the folder that contains the values files.
When the upgrade is complete, browse to the AKS cluster and view Services to see the assigned static IP addresses.
By default, the Unlocked Data solution has set the Keel approval window to 72 hours. This can be increased or decreased by modifying the YAML files within the solution, saving the files, and then performing a Helm upgrade.
The value “approvalDeadline” specifies – in hours – the approval window. The following files need updating and saving, prior to a Helm upgrade:
- Deployment - clientaccesspoint.yaml
- Deployment – clienthost.yaml
- Deployment – keel.yaml
- Deployment – kibana.yaml
- Statefulset – clientdataservice.yaml
- Statefulset – elasticsearch.yaml
- Statefulset – managementportal.yaml
Note that the values must be presented in quotes.
Support
Client Dashboard – “Unauthorised” message
Dashboard errors states “you are not authorised to use the system”
MoreCannot find Helm and / or Kubectl when installing / upgrading
Update the system paths to enable access to Helm and Kubectl executables
MoreSoftware Pre-requisites
List of software Unlocked Data utilises to setup, manage and maintain the solution within your environment.
MoreClients may be unable to access the Unlocked Data solution with the message “It looks like you are not authorised to use the system. Please contact support”. An additional symptom may be that you can’t access the Management Portal

Check that the user has been correctly set up in the Management Portal.
If user has been set up, the Management Portal Pod may need to be restarted. Within the Azure Portal, or Visual Studio code, navigate to Pods and select to delete the “management-portal-0” Pod.
The Pod will automatically be recreated, with zero data loss.
- Obtain the key and certificate files from your certificate provider
- Create c:\unlockeddata\tls folder
- Copy key and certificate files to the c:\unlockeddata\tls folder
- Copy and paste the following command in to Visual Studio Code, ensuring you update the filenames
accordingly:
kubectl -n unlockeddata create secret tls --cert c:\unlockeddata\tls\certifcate.crt --key c:\unlockeddata\tls\unlockeddata.key unlocked-tls
Please note – if you are replacing an existing certificate you will need to delete the existing certificate first – run the following command: kubectl delete secret unlocked-tls - Within the Azure Portal navigate to your AKS Cluster, click “Workloads” (left-hand pane), click on “Pods” (in the main pane), ensure you’re working in the correct namespace (usually, “UnlockedData”), click on the “external-access-ingress-nginx-controller-unlockeddata” Pod and then click “Delete”. This will automatically restart the ingress using the new TLS secret created above.
- Test your new certificate works by viewing your website.
When running Helm and / or Kubectl commands you may get the error “cannot find file…”
At Unlocked Data we recommend creating a folder where common executables can be stored and run – for example, c:\unlockeddata
You should download the Helm and Kubectl and copy them to c:\unlockeddata.
Then update your system settings (adding c:\unlockeddata to your computer’s System Path) to enable the files to be executed from other folders and applications (Visual Studio Code, for example):
To add the folder to the System Path:
- To add a path to the PATH environment variable
- On the Start menu, right-click Computer.
- On the context menu, click Properties.
- In the System dialog box, click Advanced system settings.
- On the Advanced tab of the System Properties dialog box, click Environment Variables.
- In the System Variables box of the Environment Variables dialog box, scroll to Path and select it.
- Click the lower of the two Edit buttons in the dialog box.
- Click “New” and enter the path you created above. For example: c:\unlockeddata
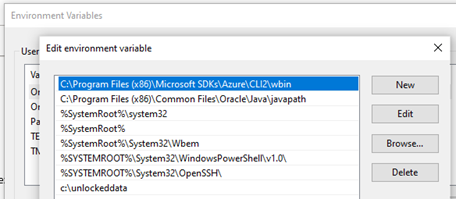
- Click OK in three successive dialog boxes, and then close the System dialog box.
Unlocked Data recommends creating a folder where the tools and solution will reside; for example, c:\unlockeddata.com.
Helm: The Unlocked Data solution utilises a Helm chart to install and upgrade the solution. Download the HELM executable from here:https://helm.sh/docs/intro/install/ and move the download file to the folder created above.
Kubectl: This is the command line tool used to manage and maintain Kubernetes environments. Download and install Kubectl by following the install on Windows process here:and https://kubernetes.io/docs/tasks/tools/install-kubectl/. Move the download file to the folder created above.
Visual Studio Code: Unlocked Data recommends using Visual Studio Code (free tool) for solution management and maintenance. Download and install Visual Studio Code from here: https://code.visualstudio.com/download.
If you have issues running the commands above, see the Unlocked Data support article “Cannot find Helm and / or Kubectl when installing / upgrading”. here
Management
Data not visible in dashboard
Kibana message “Checking folder for files…” immediately followed by “Error”
MoreView data in database
Data is being imported but the dashboards aren’t showing data – check the databases manually
MoreBehaviour league tables and visualisations are empty
Dashboards are showing data but the league tables and visualitions are blank
MoreYou attempt to load data for a specific client but the file is not being acquired from the file share, or the file is acquired but the dashboards don’t populate with data.
When reviewing Kibana you see the following:

When you expand each message the “_index” attribute relate to the same client:

Within the Error message, the “exceptions” attribute references “ClassName”: “System.IO.IOException” and “Message”: “Stale file handle”, as per below:
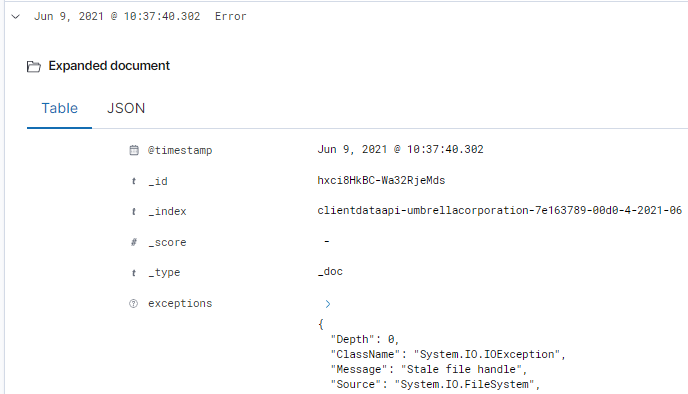
Solution: Using either Visual Studio Code or the Azure Portal navigate to Pods and Delete the Pod for the specific client (note the unique client identifier suffixed to each clientdataapi, to identify the correct Pod to delete). Copy the data back to the file share and the client pod will acquire the data and load it in to the dashboards.
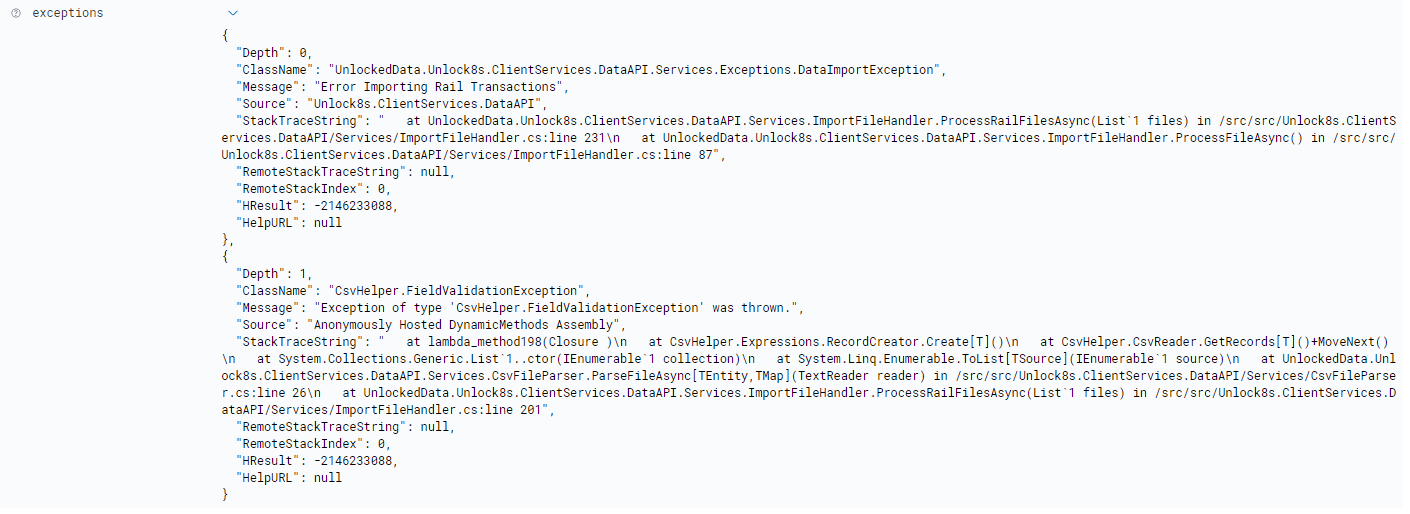
Data is acquired but fails to load with a Kibana error “Import Failed due to Error”. Upon expanding “exceptions” you see multiple messages:
- “Message”: “Error Importing Rail Transactions” (Rail in this example)
- “Message”: “Exception of type ‘csvHelper.FieldValidationException…”
Solution: Ensure that all transactions have a valid TransactionId. TransactionId is a primary key (and therefore must be present and unique in the data) and is a mandatory field. In the example below, the rail file had blank TransactionId fields.
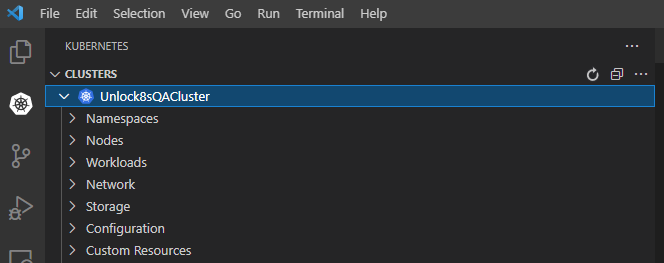
- Step 1 – Using the Unlocked Data Management Portal identify the unique identifier that the solution has assigned to the client container – this is in the form of an alpha-numeric code.
- Step 2 – go to Visual Studio Code, click on the Kubernetes plugin, and navigate to the client pod
you’re investigating.
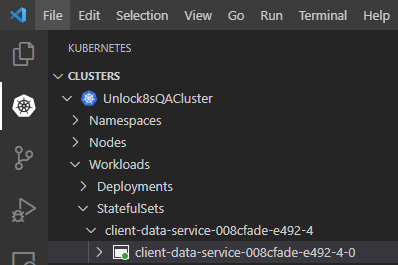
- Step 3 – Right-click on the relevant client pod and select “Terminal”.
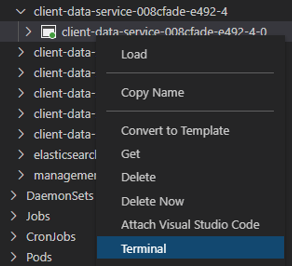
- Step 4 – Select the postgres container in the pod.
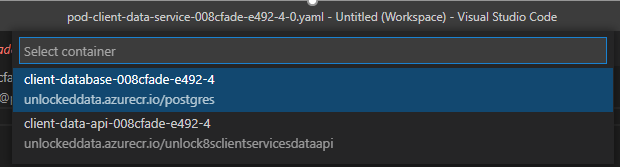
- Step 5 – copy and paste the following command in to the terminal window replacing <customvalue> with the value you have entered in to client-bespoke-values.yaml: psql -U < customvalue> -d clientdb
- Step 6 – you can view a list of tables by entering the following command: \dt
- Step 7 - To check the tables for any data, use a SQL command. The following command (please include the semi-colon) will show 10 transaction in the client’s Air table: select * from air_transaction limit 10;
You log in and the Behaviour dashboards are blank with no behaviourial visualisations or league table data loaded.
It’s likely that “Hierarchy01” hasn’t been populated, so the dashboards don’t know what to present. Ensure that Hierarchy01 has data and reload the complete data set.
Applying changes to authentication provider
You’ve changed your authentication provider – follow these steps…
MoreHow are the Summary Cards calculated
Each dashboard has Summary Cards – how are the figures derived
MoreUnable to see Unlocked Data resources in AKS
When opening Visual Studio Code you’re unable to see the Unlocked Data solution
MoreYou want to see who’s logged in.
- Within Kibana, create a “managementportal*” index with a Time Field of “@Timestamp”
- Click “Discover” in Kibana.
Follow the steps outlined below - the text to paste in to the query is:
messageTemplate : "User {Email} presented a valid token and has allocated clients“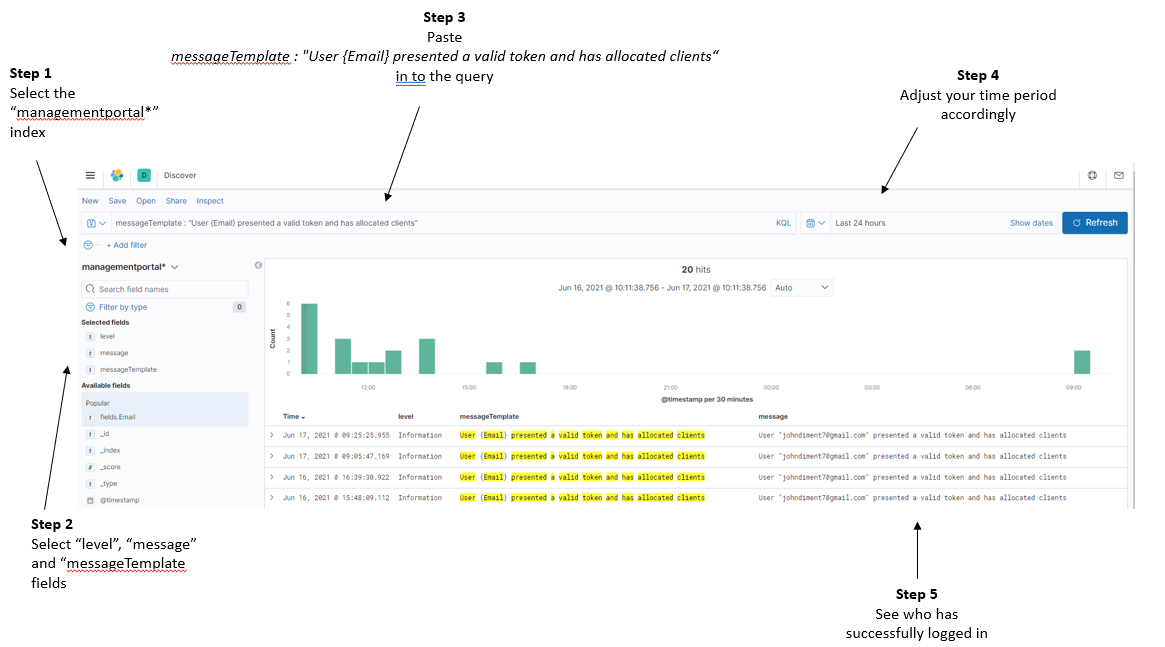
You’ve changed your authentication provider and need to update the solution with the latest settings.
Option 1 – Helm upgrade:
- Update the “issuer:” and “appid:” fields within the client-bespoke-values.yaml file.
- Save the file.
- Issue the Helm upgrade command.
- Delete the pod starting “clienthost-” to ensure that the clienthost picks up the new settings.
Option 2 – Azure change:
- Within the Azure portal, go to your AKS cluster
- Under the “Kubernetes resources” on the left-hand menu, select “Configuration”.
- Select the “unlock8s-configmap” and click on “YAML” on the left-hand-side.
- Scroll to the “OAuthAppId:” and “OAuthIssuer:” details.
- Client to “Review + save”, and if settings are correct “Save”.
- Delete the pod starting “clienthost-” to ensure that the clienthost picks up the new settings.
All dashboards have a summary for Spend, Sustainability, Travellers and Tickets, similar to the Air Summary below.

Air Summary Cards:
- TransactionType = “S” is +1.
- TransactionType = “R” is -1.
- Any other TransactionType is 0.
Rail Summary Cards:
- TransactionType = “S” is +1.
- TransactionType = “R” is -1.
- Any other TransactionType is 0.
Hotel Summary Cards:
To resolve this issue, select the relevant AKS cluster, expand “Namespaces” , right click on “unlockeddata” and select “Use Namespace”.
This action sets the “unlockeddata” namespace as the default namespace and will enable you to view the Unlocked Data resources.
Creating an index in Open Search
For monitoring and alerting you need to create Open Search indexes – this article explains how
MoreCan I see if data is loaded / loading?
Instructions on how to see if data is in the client database
More- Go to the Open Search dashboards Home screen
- Click “Manage” (top right of screen)
- Click on “Index Patterns” (left hand menu item)
- Click on the large “Create index pattern” button (top right of the screen)
- Step 1: Select the index you want to monitor
- If you’re looking at a specific client, enter “clientdataapi-<clientname>*” (ignoring the quotes)
- Then click the “Next Step” button
- Step 2: in the “Time Field” drop down box, select the “@Timestamp” option
- Click on “Create index pattern”
Now that you’ve created the search index you can go to the Open Search dashboards and start looking at logging.
- Click on the large “OpenSearch Dashboards” icon on the top left
- From the home screen click on “OpenSearch Dashboards”
- Click on “Discover”
- Using the drop down on the left-hand side, select the index you created above
- Next to the Search box, select the period you’re interested in observing
- Click “Update” to see all the relevant entries.
- Tips:
- Under “Available fields” (on the left side of the screen) add “Level” and Message”
- Click on a message to expand it and understand more about the log entry
- If you’re interested in data acquisition – search for “Import”
- You have uploaded a ZIP file that contains and AT.csv file that is successfully acquired from the file share.
- The data isn’t represented in the dashboards and when looking in the logs you see the error “Import Failed due to error”
- When looking in to the “Exception” within the OpenSearch message there’s no clear indication as to why the data wasn’t loaded.
- You do see “FieldValidationException” which indicates an issue with data within a row, rather than an overarching problem.

- In this instance we recommend checking your data to ensure the following is correct:
- If a value for OriginalTicketNumber exists, there needs to be a value in OriginalTicketValue
- If a value for OriginalTicketValue exists, there needs to be a value in OriginalTicketNumber
Business logic exists within the data load to ensure that complete data sets are loaded.
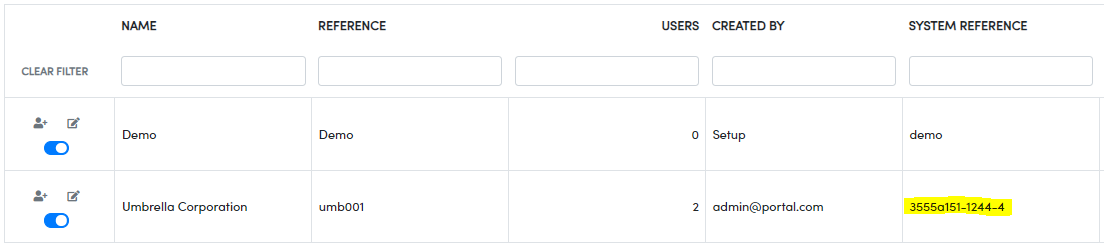
- First things first – identify the System Reference of the client you’re interested in.
- TIP: Go to the Management Portal client list
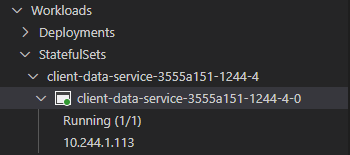
- Within Visual Studio Code, navigate to the Kubernetes cluster.
- When in the cluster, navigate to StatefulSets:
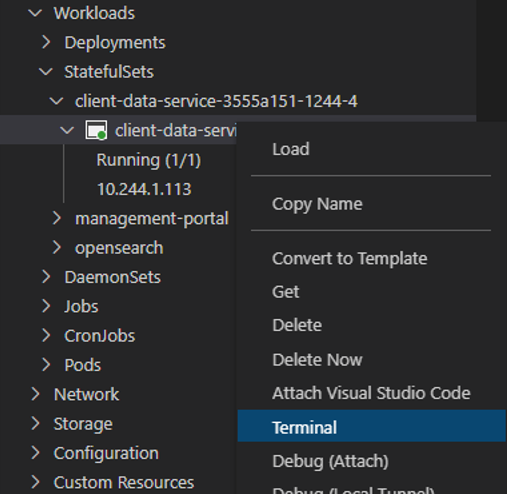
- Right click on the Pod and select Terminal
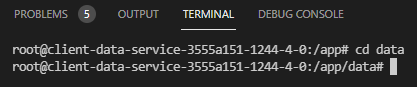
- Let’s get you in to the client’s data directory. Within the Terminal window type in the following command – cd data
- Now you’re in the data folder, type in the following command to list the files – ls -l
- This will list the files in the folder. In the example above we can the see database size is shown in the centre.
- TIP: You can type is ls -l again to see of the file size increases – this would show that data is still loading.
- Type exit to close the Terminal window.